Thursday 28 July 2016

Presents for a very sick friend

i just added butterflies to this pretty tissue box!


 So a very good friend of ours had a freak accident a few weeks ago whilst on holiday. She got run over by her caravan as her husband drove off! She had a smashed pelvis three breaks in her back, damaged spleen and kidneys and other internal injuries!,
So far from home, which is Liverpool,mshe is in Southampton general hospital so only her husband is there to be able to visit her.
I sent flowers but she was unable to have them in the intensive care unit. So i put my mind to getting parcels of things that she can use now. I didnt want boring things like wet wipes to look boring so i spent some time making bags and boxes for the items.


Wednesday 27 July 2016

Pootles Design Team July Week Four Just a Little Note

Well here we are at the fourth week of my time on the Pootles Design Team. i have really enjoyed stretching my creative muscles and would like to thank Sam for giving me this chance to show off my creative side!

This week I thought I would take advantage of the fact that all crafters are hoarders and are unable to throw away any paper or card no matter how small! With the small elements in the Every Occasion stamp set I thought I would blend these two things together.


Ok I know what I have done is nothing new, I cut old DS paper pieces into 2cm wide strips. Used my triple banner punch to notch out the ends and randomly stuck them to my cards.  Oh my cards only measure 3 1/4 x 4 1/2 inch, yet again used from left over pieces of my A4 cardstock!!

I used a black art liner pen to put faux stitching on the banners, just to make them a little more funky.
I stamped the star using Tangerine Tango ink and cut out using a small circle punch.  I then double heat embossed the circles and mounted them onto a slightly larger circle cut from some left over Old Olive card.
A strip of Old Olive card across the top of the banners.  Once again marked with faux stitching and the star fixed on using dimensional.

Just a note.... Stamped from the Better Together stamp set and the cards were done.

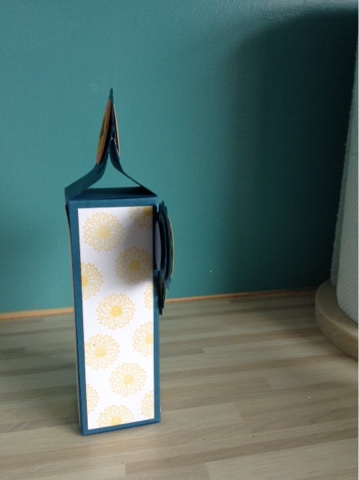
I made a box ( I need to make a second one as I produced so many cards lol), by randomly stamping the wreath image in Emerald Envy, putting a belly band using some leftover Hello Honey cardstock.

Whilst not all my papers are current items I think that I have proved that this stamp set can be one of those go to sets when you need to make a quick card for virtually any or should I say Every Occasion!!


To pass on the "love" I have two sets of these notecards that I would like to send out to two randomly picked people who post a comment.  So please post and I will get my grandaughter to draw out two names.

Thankyou for joining me and........Happy Crafting!!


Wednesday 20 July 2016

Pootles Design Team July week three Thank You Sir

Well here we are and its week three already! Considering that I really didn't "get" the stamp set Every Occasion when I was first introduced to it, I have to admit that now it is growing on me.  If you want to make a BIG statement, then this stamp set is not really the one, but if you want a smallish card and to cover just about any occasion then this set ticks the boxes.  So far I have done easier themes but this week I chose to use the satchel.  My first thoughts were starting school.  But then I thought about the fact that all the children are getting ready to leave classes, and leave schools.  Well its always reasonably easy to get that gift for the female teachers but the male one, maybe not such an easy thing.

So here is my offering for an idea for the male teacher in your childs life!!


First of all I stamped the satchel image over some A4 card.  i used Early Expresso ink and stamped off three times thus getting different density of colours.

I scored my box using my Score board and put it together so that it has points as opposed to making a tidy box!  To see how I make this box please go to my youtube video where hopefully I can explain it to you!

A band of Soft Suede card around the box with a Thanks stamped using  the Crazy About You stamp set,  onto a punched circle and mounted onto a scalloped circle.  This box fitted a coffee mug quite happily into it, wrapped in plastic wrapping and tied off with some Linen Thread with a tag with a satchel stamped onto the circle and mounted once again on a scalloped circle, and the gift was complete.

With the card once again being for a man I knew it had to steer away from flowers etc, so I made my card base using my Soft Suede cardstock.  A border at the bottom using some of my stamped card and the word Thanks cut using my Hello You thinlets.  The only other thing I did wa draw some dashes above and below the stamped border, using a white gel pen.

There you have it a respectable pressie for that much loved male teacher!


Thursday 14 July 2016

Use up and catch up cards

So its that time in my craft room when i use up all those bits and pieces of paper and card thhat have been kept as you just can't throw them away when you are a crafter....right?
So when looking on Pinterest i came across a card making lolipop flowers, i liked the idea but decided to do it my way.
So using a selecyion of punches i got cutting. As i built up the flowers i drew dashes using a white del pen.
I like the finished items but which is better? The scalloped flowers or the circle ones?

Wednesday 13 July 2016

Pootles Design Team July Week Two Goodbye and Goodluck

So its the second week of July and here I am again stretching the old grey matter and creating my offering from the Every Occasion stamp set.

Just like last week I am using the stamps to decorate my card so that I can use on my project.

When I was shopping the other day I found myself in the wine section, heavens only knows why, because we rarely drink wine. But anyway I saw these small bottles that hold a glass of wine, depending on the size of your glass! So I picked them up, thinking that they would make a nice little gift for someone. So with that idea in mind that is the idea i went along with.

I measured out a 2" strip of card and used 2 my Banner Triple punch to puch the bottom of it. A. 1 3/4 circle punch dor it to go over the neck of the bottle and the Decorative label punch with 2" circle punched and coloured with my Delightful Dijon ink pad.

I stamped over in the sam ink the sunflower image the banner, then stamped the glasses onto the circle. Plus "enjoy" from the Endless birthday wishes stamp set. A piece of ribbon threaded through the label to hold around the body of the bottle and the label fixed to the front using dimentionals and that part of my project was finished.

Finally a strip of dtamped card mounted onto a piece of Deligful Dijon cardsrock. The sentiment stamped from the Greatest Greetings set and final some petite petals punched out and mounted onto loops of linen thread.

Quite a simple project but a lovely gift for a work collegue who is moving on.

Monday 11 July 2016

Every occasion flower box


Today i made a slimline box measuring 5.5 x2 " i put panels on it using the sunflower stamp from the every occassoons stamp set then i made some flowersusing my circle punches and stamped a star for the centre of the flower.
Held together at the top of the box by another flower, the box holds tealights so is a fun box for a relatively cheap gift.

Friday 8 July 2016

Baby cards galore

Well i have recently been asked to supply a good friend with a selection of baby cards in various colours. Those being pink, blue, lemon and pale green.

So having just made some pink cards i set my mind to making the blue and green ones.  Here is a slection of those, so now all i have to do is create some lemn ones!

Wednesday 6 July 2016

Pootles Design Team July week one baby gift set


Well the stamp set being used this month is "Every Occasion". I have to be honest looking through the catalogue I passed them by each and every time. They were certainly not high on my want list. To be honesy they weren't even low on my want list!

But these are the stamps that Sam has given to her July Design Team. Oh how I regretted putting up for that job! I really had problems seeing how I could use these stamps. But then slowly a lightbulb moment started to flicker into life, and once one idea popped up others started to follow!!

So after that lengthy procrastination, here is my first offering for the month of July!!

So first out I have to admit that I am short on supplies at the moment. Yes I have SU papers but they are not ones from the new catalogue! But I did buy the new n colours ink pads, and so therefore I have recently been making all my own dsp using the pads along with various stamp sets.

So first of all I made some gingham card up. i taped two strips of card 1 cm apart and sponged between them using Sweet Sugarplum. I continued down the length of the ard until it was striped, then turned it around 45 degrees and started again!! To make it pop out a little I then drew lines using a white gelly roll pen. Final result a piece of gingham card that will match exactly to the rest of my project.
lines being sponged onto card.  
finished dsp
 i cut some A4 card to make 4 3/4 inch square cards. Cut a strip of the gingham, a strip of white card onto which I stamped the babygro and fixed a strip from the card that I had used to mark off my lines as that was nicely inked up! On one card I have used my scallop edge for my trimmer on the other i have left it straight, just to show how slight changes can make a big difference.

With a greeting stamped from the Better Together Set that was my cards complete.

I then started on my little gift box. Using my Curvy Keepsake thinlets dies, I cut out half of the die using the gingam card and the other half using plain white card (making sure that both sets of pieces had the square base cut out on them). A quick bit of glueing together, a quick stamp of the babygro on the front and the boxes were complete apart from a rose I made for the top using a large circle punch and the pansy punch,  on the top and a little gift tag.  The greeting is part of the congratulaions on your new arrival stamp.

The Curvy Keepsake box will hold either a bib or a pair of baby socks, a nice little gift for the new mum and baby.

Finally I made up a small box using the leftover gingham card around the edges.  Decorated using the Petite Petals punch and candy dots made using my smallest circle punch.

All in all quite a simple make and all that was used was two stamps sets, an ink pad and some white card.  


Sunday 3 July 2016

Its a challenge

So I decided to take up the challenge set by Sam Hammond of Pootles!! Use any combo of four colours she said!! So as I only own three of the four that sort of decided my colour pallette!!
Colours used....

Apart from two sheets of card coloured in Pool Party all I used was white cardstock.  I stamped an A4 sheet  using Playful Backgrounds, using a different colour and background for each sheet.  Then I randomly chopped up all the card and made a selection of cards.

I used the Hello You thinlets dies and Swirly Scribbles thinlets dies and the Endless Birthday Wishes sentiments stamp set.

I have managed to make 7 cards 4 3/4 square, plus 6 notelets 2 3/4 x 4 1/2 made using the off cuts from my white cardstock.  The only pieces of card that I had left I punched out a few small flowers so there is absolutely no waste at all!! 

I don't know what you all think, but I am pretty happy with todays work!!